Don’t Panic! A Guide to Understanding and Fixing Midea Dishwasher Error Codes
In this comprehensive guide, we’ll walk you through the most common Midea dishwasher error codes and provide clear, step-by-step troubleshooting solutions. Our goal is to help you quickly diagnose the problem, understand the potential causes, and get your dishwasher back to sparkling clean dishes without the hassle of hand-washing.
Common Midea Dishwasher Error Codes and Troubleshooting Steps
Before you begin troubleshooting, always unplug your dishwasher from the power outlet to prevent electrical hazards.
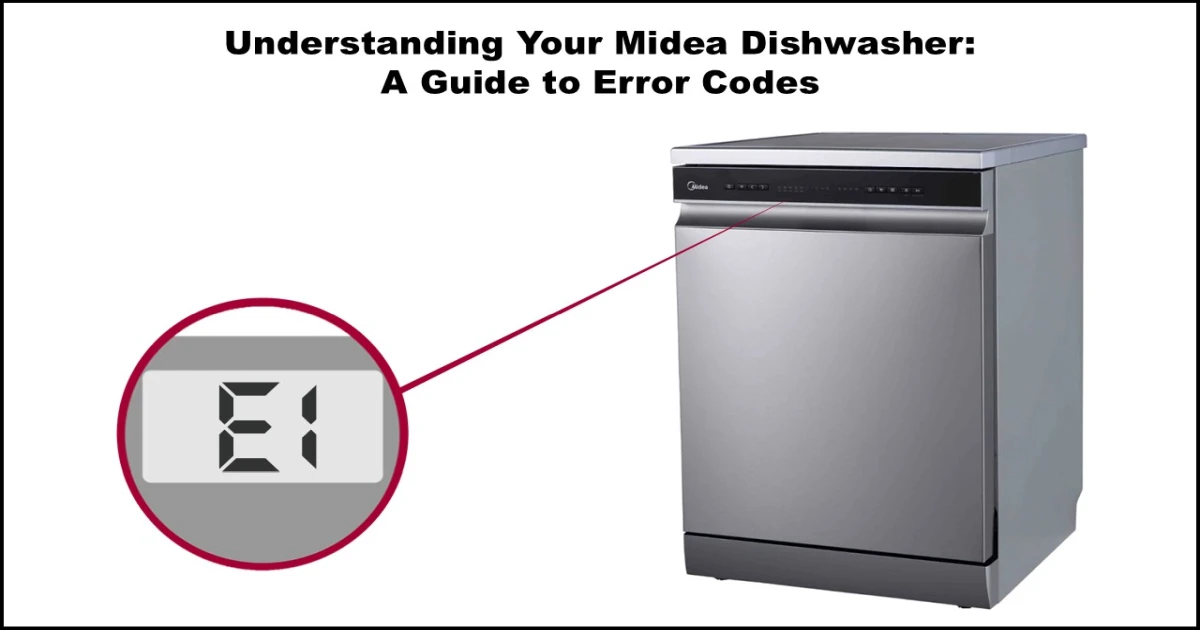
E1: Water Inlet Valve Error
This error occurs if the dishwasher’s flow meter doesn’t detect water entering the machine after 4 minutes.
Potential Causes:
- The water supply tap is closed.
- Insufficient water pressure (should be around 0.1 MPa or higher).
- The inlet hose is blocked, kinked, or frozen.
- A faulty water inlet valve or the aqua-stop safety feature.
- A malfunctioning water flow meter (liter counter).
- A problem with the main control board (PCB).
Troubleshooting Steps:
- Check Water Supply: Ensure the water tap connected to the dishwasher is fully open and that your home’s water pressure is adequate.
- Inspect Inlet Hose: Examine the water inlet hose for any kinks, bends, or blockages. Clean the filter screen on the inlet valve connection point.
- Test Inlet Valve:
- Disconnect the wire harness from the inlet valve.
- Measure the resistance across the terminals of the solenoid valve using a multimeter. The expected value is typically between 3 – 4.3 KΩ.
- If the reading is outside this range, the valve may be faulty.
- Check Flow Meter (Reed Switch): The flow meter contains a reed switch that opens and closes as water flows. You can test it with a magnet and a multimeter set to continuity mode. The switch should close when a magnet is near and open when it’s moved away.
- Wiring: Check the wire harness connecting the inlet valve and flow meter to the main PCB for any loose or damaged connections.
- Main PCB: If all other components check out, the issue could be with the main control board and may require replacement.
E2: Drain Pump Motor Error
This error indicates a problem with draining the water from the dishwasher.
Potential Causes:
- Clogs in the drain filter, drain hose, or household plumbing (siphon).
- A faulty drain pump.
- A problem with the main control board (PCB).
Troubleshooting Steps:
- Clear Blockages: Check and clean the dishwasher’s drain filter thoroughly. Inspect the drain hose for any kinks or blockages. Verify that your under-sink plumbing (where the dishwasher drains) is not clogged.
- Test Drain Pump:
- Disconnect the wire harness from the drain pump.
- Measure the resistance across the drain pump motor terminals using a multimeter. The expected value is typically around 180 Ω.
- If the reading is significantly different, the pump motor is likely faulty.
- Main PCB: If the pump and drainage paths are clear, the issue might be with the main control board.
E3: Heater Assembly Error
This error appears if the dishwasher’s temperature doesn’t reach the required level within 9 minutes during a heating phase.
Potential Causes:
- Faulty wiring harness connections to the heating system.
- Issues with the safety thermostats (often there are two).
- Defective heating elements.
- A problem with the pressure switch (which senses water level).
- A problem with the main control board (PCB).
Troubleshooting Steps:
- Check Wiring: Inspect the wire harness connecting the heater assembly, thermostats, and pressure switch to the main PCB for any loose or damaged connections.
- Test Safety Thermostats:
- Locate the safety thermostats (they are usually inline with the heater circuit).
- Measure their resistance using a multimeter. At room temperature, a healthy thermostat should show very low resistance (near 0.1 Ω), indicating a closed circuit. An open circuit (infinite resistance or ‘OL’) indicates a faulty thermostat.
- Test Heating Elements:
- Locate the heating elements (usually at the bottom of the wash tub).
- Measure the resistance across the heating element terminals. The expected value is typically around 29 Ω. A much higher or infinite reading indicates a faulty element.
- Check Pressure Switch (Water Level Sensor): The pressure switch verifies that there is enough water in the tub before heating.
- With no water in the tub, the switch should show an open circuit (infinite resistance).
- With the appropriate water level (you might need to manually add some water to test), the switch should show a closed circuit (near 0.1 Ω).
- Wash Pump: Ensure the wash pump is running correctly and circulating water, as the heater won’t function properly without water flow. Check for blockages in the pump impeller.
- Main PCB: If all other components test correctly, the main control board could be the issue.
E4: Water Leakage Error
This critical error is triggered when the anti-flood sensor (usually located in the base of the dishwasher) detects water.
Potential Causes:
- Damaged or loose hoses (inlet, drain, or internal).
- A faulty anti-flood overflow float switch.
- A problem with the pressure switch (sometimes involved in leak detection systems).
- Damaged seals around the door or pump.
- Faulty wire harness connections to the anti-flood sensor.
Troubleshooting Steps:
- Locate the Leak: This is the most important step. Carefully inspect the dishwasher’s interior, hoses, connections, and the base area for any signs of water leakage. Look for puddles or water stains.
- Inspect Hoses and Seals: Check the inlet hose, drain hose, and all internal hoses and seals for cracks, splits, or improper connections. Tighten any loose fittings. Examine the door seal for damage.
- Check Anti-Flood Switch: The anti-flood switch is typically a float mechanism in the base tray. If water collects in the tray, it lifts a float, activating a switch. Check that the switch isn’t stuck and that its wiring is intact.
- Check Pressure Switch: In some models, the pressure switch can also contribute to leak detection. Verify its function as described in the E3 section.
- Wiring: Check the wire harness connecting the anti-flood sensor to the main PCB.
- Repair/Replace: Once the source of the leak is found, repair or replace the damaged component (hose, seal, pump, etc.). You will also need to dry out the base tray completely to reset the anti-flood sensor.
E6: NTC Sensor Opened-Circuit Error
This error indicates that the NTC (Negative Temperature Coefficient) sensor, which measures water temperature, has an open circuit (no continuity).
Potential Causes:
- A faulty wire harness connecting the NTC sensor to the main PCB (broken wire or loose connection).
- A faulty NTC sensor itself.
- A problem with the main control board (PCB).
Troubleshooting Steps:
- Check Wiring: Inspect the wire harness connecting the NTC sensor (usually located near the heater or wash pump) to the main PCB. Look for damaged wires or loose connectors.
- Test NTC Sensor:
- Locate the NTC sensor.
- Disconnect the wire harness.
- Measure the resistance across the sensor terminals using a multimeter. The resistance of an NTC sensor changes with temperature. At room temperature (around 77 °F or 25 °C), the resistance should be approximately 10 KΩ (10,000 Ω).
- If the resistance reading is infinite (‘OL’), the sensor has an open circuit and needs replacement.
- Main PCB: If the wiring and sensor test correctly, the issue might lie with the main control board.
E7: NTC Sensor Shorted-Circuit Error
This error indicates that the NTC sensor has a short circuit (very low resistance), leading to an incorrect temperature reading.
Potential Causes:
- A faulty wire harness with wires shorting together or to the appliance frame.
- A faulty NTC sensor itself.
- A problem with the main control board (PCB).
Troubleshooting Steps:
- Check Wiring: Inspect the wire harness connecting the NTC sensor to the main PCB for any signs of damage or wires touching each other or the metal chassis.
- Test NTC Sensor:
- Measure the resistance across the NTC sensor terminals. As mentioned before, the resistance varies with temperature. At a slightly warmer temperature, say around 122 °F (50 °C), the resistance should be approximately 4.2 KΩ (4201 Ω).
- If the resistance is very low (close to 0 Ω) at room temperature, the sensor is likely shorted and needs replacement.
- Main PCB: If the wiring and sensor test correctly, the main control board could be the culprit.
E8: Diverter Valve Error
This error relates to the diverter valve, which controls water flow to different spray arms (upper, lower, or both).
Potential Causes:
- Faulty wire harness to the diverter valve (open circuit, loose connections, or misplacement).
- A faulty microswitch within the diverter valve assembly.
- A defective micromotor that positions the diverter valve.
- A problem with the main control board (PCB).
Troubleshooting Steps:
- Check Wiring: Inspect the wire harness connecting the diverter valve assembly to the main PCB for any loose or damaged connections.
- Test Diverter Valve Assembly: The diverter valve is often sold as a complete assembly including the motor and microswitch. Testing individual components can be complex. If wiring is good, replacing the diverter valve assembly is often the most effective solution.
- Main PCB: If a new diverter valve doesn’t resolve the issue, the main control board may be at fault.
E9: Shorted Key Error
This error is triggered when the dishwasher’s control panel detects that one or more buttons have been continuously pressed for an extended period (over 30 seconds).
Potential Causes:
- Something physically pressing against the buttons on the control panel.
- Moisture or debris on the control panel surface interfering with the touch buttons.
- A faulty control panel assembly.
Troubleshooting Steps:
- Check for Obstructions: Ensure nothing is leaning against or touching the control panel.
- Clean Control Panel: Carefully clean the surface of the control panel with a soft, dry cloth. Ensure there is no moisture or food debris around the buttons.
- Power Cycle: Turn off the dishwasher, unplug it for a few minutes, and then plug it back in and switch it on. This can sometimes clear temporary errors.
- Test Buttons: Carefully press each button on the control panel to see if any feel stuck or elicit an immediate error.
- Replace Control Panel: If the error persists after cleaning and power cycling, the control panel assembly is likely faulty and needs to be replaced.
Ed: Communication Failure
This error occurs when the main control board and the display board (user interface) are unable to communicate with each other for over 20 seconds.
Potential Causes:
- Faulty wire harness connecting the main PCB to the control board (open circuit, loose connections, or damage).
- A faulty control board (display board).
- A faulty main control board (PCB).
Troubleshooting Steps:
- Check Wiring: Inspect the wire harness that connects the main control board (usually located at the bottom or rear of the dishwasher) to the display control board (on the door). Look for any loose, damaged, or disconnected wires.
- Replace Control Board: If the wiring appears intact, the display control board may be faulty and require replacement.
- Replace Main PCB: If replacing the control board doesn’t resolve the communication error, the main control board is likely the issue and will need to be replaced.
EC: BLDC Motor Error
This error specifically applies to models equipped with a Brushless DC (BLDC) wash pump motor and indicates a problem with its operation or control.
Potential Causes:
- Faulty wire harness connecting the main PCB/inverter board to the BLDC motor.
- A faulty BLDC wash pump motor itself.
- A faulty inverter board (which controls the BLDC motor).
- A problem with the main control board (PCB).
Troubleshooting Steps:
- Check Wiring: Inspect the wire harness connecting the main PCB (or inverter board, if present) to the BLDC wash pump motor. Check for loose or damaged wires.
- Test BLDC Motor Windings:
- Locate the BLDC motor and disconnect the wire harness.
- Using a multimeter, measure the resistance between the three motor terminals (U, V, and W).
- The resistance between U and V, V and W, and W and U should all be approximately the same, around 59 Ω. Significant variation or an open circuit (OL) indicates a faulty motor.
- Check Inverter Board: BLDC motors require an inverter board to function. If your model has a separate inverter board, it could be the source of the problem. Visual inspection for burnt components is a start, but often replacement is necessary for testing.
- Main PCB: If the wiring, motor, and inverter board (if applicable) seem fine, the issue might be with the main control board.
Conclusion
Dealing with a malfunctioning appliance is never fun, but understanding Midea dishwasher error codes empowers you to tackle the problem head-on. By following the troubleshooting steps outlined in this guide, you can often identify and fix common issues yourself, saving time, money, and the inconvenience of washing dishes by hand.