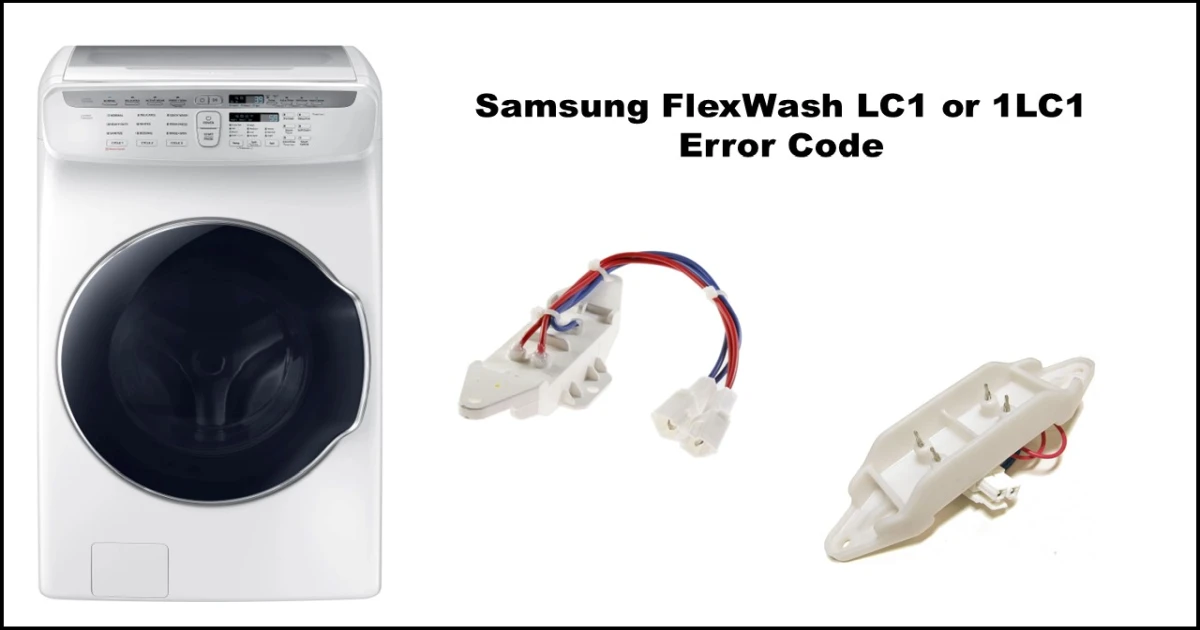
Troubleshooting Samsung Flex Washer Error 1LC1 or LC1: Your Guide to Fixing Top Washer Leaks
Seeing the 1LC1 or LC1 error code flashing on your Samsung FlexWash display, possibly accompanied by water leaking from the top washer’s dispenser area, can be frustrating. You invested in a versatile machine, and now it’s signaling a problem. The good news is you’re not alone, and this specific error often points to a common, fixable issue. This guide will walk you through understanding the error code, identifying the likely cause, and providing step-by-step instructions to resolve the leak yourself.
Understanding the Samsung Flex Washer Error 1LC1 or LC1
What Does the 1LC1 / LC1 Code Mean?
This error code specifically indicates that your washer’s internal leak sensor has detected water in an area where it shouldn’t be, pinpointing the upper washer compartment as the source.
Is the Leak Sensor Broken?
Probably not. While the error involves the leak sensor, the code appearing usually means the sensor is working correctly. It’s doing its job by alerting you to an actual leak. The problem typically lies elsewhere, specifically with how water or softener is being managed in the top dispenser.
The Common Culprit: Fabric Softener Buildup
Why Does the Top Washer Leak?
The most frequent cause behind the 1LC1 / LC1 error in FlexWash models is related to the fabric softener dispenser in the upper washer. Here’s the breakdown:
- Softener Properties: Fabric softeners contain ingredients that can thicken or even solidify, especially when exposed to cooler temperatures (designed for room temp, roughly 15-25°C / 41-77°F).
- Dispenser Mechanism: The dispenser holds the softener until the final rinse cycle. Water then flows in, creating a siphon effect that draws the softener down a hose and into the drum. A small rubber seal (often called seal rubber) inside the dispenser mechanism prevents water from entering the softener compartment prematurely. This seal floats up to block the hole when water is present and drops down to release the softener when the water drains.
- How Buildup Causes Leaks: If you use too much softener or if the softener thickens significantly, it can create a sticky residue. This residue can cause the rubber seal to get stuck in the closed (up) position. When the washer tries to add water for the siphoning action, the stuck seal prevents proper flow. Water backs up, overflows the dispenser compartment, spills inside the machine, and triggers the leak sensor—resulting in the 1LC1 / LC1 error and the cycle stopping.
The Recommended Solution: Upgrading to the Seal Cap Guide
Fortunately, there’s an improved part designed to address this specific sticking issue. Instead of just cleaning or replacing the original rubber seal, the most effective long-term fix is often to install the Seal Cap Guide (Part Number: DC62-00702A).
Why is the Seal Cap Guide Better?
- Design: This plastic cap features raised edges and gaps, creating less surface area for thick softener to cling to.
- Reduced Sticking: Its design significantly minimizes the chance of the seal getting stuck compared to the original flat rubber seal.
- Improved Sealing: While counter-intuitive, the smaller sealing surface around its diameter is less prone to the type of leak caused by softener buildup.
Replacing the original Seal Rubber with this Seal Cap Guide is the recommended procedure to permanently resolve leaks caused by softener buildup.
Step-by-Step Repair Guide: Replacing the Seal
Disclaimer: Proceeding with this repair requires some technical skill and involves disassembling parts of your washing machine. If you are uncomfortable with DIY appliance repair, please contact a qualified technician. Always prioritize safety.
A. Before You Start:
- Safety First! Disconnect the washing machine from both power and water supplies.
- Gather Tools: You’ll likely need screwdrivers (Phillips head, possibly a small flathead, short screwdriver), pliers (for clamps), a bucket, and towels.
- Prepare Workspace: Ensure you have enough light and space to work.
- Get the Part: Have the new Seal Cap Guide (DC62-00702A) ready.
- Take Photos: As you disassemble, take photos of connections and screw placements. This is invaluable for reassembly!
B. Disassembling the Upper Washer:
(This involves numerous steps. Follow them carefully.)
- Lift the top washer lid.
- Use a small screwdriver to slide the hinge pin (usually on the left) and lift the lid off.
- Remove the detergent and softener dispenser drawers.
- Remove the dispenser panel (may require unclipping or removing screws hidden by drawers).
- Remove the 3 screws from the front of the main control panel.
- Carefully push the control panel inwards and then upwards to release its securing tabs. You might need the flathead screwdriver to gently pry tabs.
- Lift the control panel off, being mindful of any connected wires (disconnect if necessary, noting positions).
- Place a rolled towel under the front edge of the entire machine to lift it about 6 inches (this provides access to bottom screws).
- Using a short screwdriver, remove the 2 screws securing the bottom of the front panel.
- Open the debris filter cover (usually in the bottom corner) and remove the screw inside.
- Remove the filter cover panel. Extend the small drain hose into your bucket and drain any residual water. Lower the washer back down.
- Carefully peel back the door seal (diaphragm) from the front panel lip and release the door lock mechanism (usually 2 screws).
- Remove the 4 screws along the top edge of the front panel (often hidden under the control panel area).
- Use a screwdriver to gently release any side tabs holding the front panel.
- Lift the main front panel UPWARDS slightly to disengage it from bottom brackets, then pull it away.
- Locate the “bridge cover” (plastic piece between top and bottom tubs)—remove its 5 screws and lift it off.
- Release the spring clamps and disconnect the upper drain hose (have a towel ready for drips).
- Release the clamp and separate the upper water supply hose.
- Remove the left and right mounting screws securing the top washer unit to the main chassis.
- Remove the hose clamp screw (often securing a vent or drain hose).
- Remove the 2 screws for the wiring/hose cover plate (usually rear top) and remove the plate.
- Release the clamp and separate the main upper drain hose connection (again, have a bucket/towel ready). Drain any remaining water carefully.
- Remove the 2 screws securing the top cover panel of the machine.
- Lift the top cover up and off. You might need to partially open the (now removed) top washer lid’s hinge area to help release it.
- Remove the ground screw connecting the chassis to the top washer unit.
- Carefully disconnect the wiring harnesses connecting the main machine to the top washer unit. Note their positions or take clear photos before unplugging.
- With a helper if possible, carefully lift the entire top washer unit straight up and off the main chassis.
- Gently place the top washer unit on its side on a protected surface (like towels) to access the bottom.
C. Replacing the Seal:
- Locate the softener dispenser hose connection underneath the top washer unit. Disconnect it (likely a clamp).
- Identify the CAP Valve assembly where the hose connected. Unscrew the cap.
- Inside, you’ll find the old Seal Rubber. Remove it.
- Insert the new Seal Cap Guide (DC62-00702A) in its place, ensuring it’s oriented correctly.
- Screw the CAP valve back on securely.
- Reconnect the softener dispenser hose and secure the clamp.
D. Pre-Reassembly Checks:
While things are open, it’s wise to check:
- Inspect Hoses: Look for any cracks, wear, or loose connections on all hoses you can access (supply, drain, internal).
- Check Drain Pump: Briefly check the lower washer’s drain pump filter area for obstructions (lint, coins, etc.).
- Leak Sensor Area: Thoroughly wipe dry the area around the leak sensor at the base of the machine. Ensure no detergent residue or moisture remains.
- (Optional) Check Sensor Resistance: If you have a multimeter, you can check the leak sensor’s resistance. It should typically be between 0.2 and 1.2 Ω. An “OL” (Open Loop) reading indicates a faulty sensor (though this is rare for this error code).
- Clean Spills: Ensure no detergent or softener has spilled inside the machine casing.
E. Reassembling Your Washer:
- Carefully follow your disassembly steps in reverse order.
- Pay close attention to reconnecting wiring harnesses correctly and securely.
- Ensure all hoses are reconnected and clamps are tight.
- Make sure all screws are replaced and panels are seated correctly before tightening.
- Double-check the door seal is properly seated around the drum opening.
Preventing Future Leaks
- Use Softener Sparingly: Avoid filling the dispenser past the MAX line.
- Dilute Thick Softener: If your softener seems thick, consider diluting it slightly with water before adding it.
- Regular Cleaning: Periodically remove and clean the dispenser drawers and compartments according to your user manual. Run a self-clean cycle regularly.
- Consider Liquid Temperature: Store softener at room temperature.
Conclusion
The Samsung FlexWash 1LC1 / LC1 error code, while alarming, often points to a manageable issue with softener buildup in the top washer’s dispenser. By understanding the cause and carefully following the steps to replace the original rubber seal with the improved Seal Cap Guide (DC62-00702A), you can effectively resolve this common leak problem.